Lost Path Redundancy to Storage Device

After installing 3 new hosts, I kept getting errors for Storage Connectivity stating “Lost path redundancy to storage device naa…….”.  We had 2 fibre cards and one of the paths was being marked as down.  I spent a couple weeks troubleshooting and trying different path selection techniques.  Still, we would randomly get alerts that the redundant path has gone down.  The only fix was to reboot the host, as not even a rescan would bring the path back up.

So after some trial and error, I found a solution.  The RCA isn’t necessarily complete yet, but I believe it was a problem with the fibre switch having an outdated firmware and us using new fibre cards in our hosts.  When using the path selection of Fixed, it would randomly pick an hba to use for each datastore.  Some datastores would use path 2 and some would use path 4.

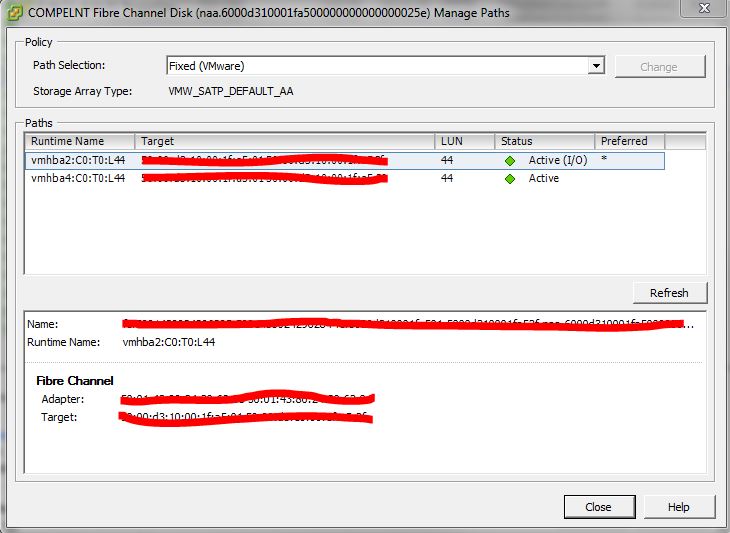
The solution I came up with was to manually set the preferred path on each datastore (we have about 40, so it was no easy task).  You go into your host configuration, choose storage, pick a datastore and go into properties.  Inside this window, select manage paths from the bottom right and you should see your HBA’s listed.  There is a column marked Preferred with an asterisk showing which hba to prefer for the datastore (see the image below).  I went through and manually set the preferred path to be hba2 instead of letting vmware pick the path. The path selection is persistent across reboot as well when setting it manually.

storage path selectionSince manually setting the preferred path, the hosts have been stable and we have not gotten any more errors about path redundancy.  This is pretty much a band aid fix but at least we are not rebooting hosts 2-3 times per week.

MTU Mismatch and Slow I/O

After a month or two of troubleshooting some storage issues we have been having with our NetApp system, we dug up an interesting piece of information.  When reviewing the MTU size on the host and on the NetApp, we noticed that the host was set for 1500 and the NetApp interface was set at 9000.  Whoops!

Before troubleshooting, we were seeing I/O at a rate of about 2500 IOPS to the NetApp system. However, when making the MTU change to match on both the ESXi host and the NetApp, we saw IOPS jump to close to 10,000.  Just a quick breakdown of what was happening here:

  1. The host would send data with an MTU of 1500 to the NetApp.
  2. The NetApp would retrieve the data and try to send it back at 9000
  3. It would fail from the switch stating it could only accept 1500
  4. The NetApp would then have to translate the data down to 1500

Basically, we were doubling the time it took to return the data back to the host and in turn to the guest VM.  The slow I/O was due to the translation time on the NetApp to get the proper data back to the host.  The switch interface was also set at 1500 and was rejecting the traffic.

Word to the wise: Always double check MTU settings and ensure it is the same through the entire path back to the host.  Just another one of those things to have in your back pocket when troubleshooting.

Datastore not visible after upgrading to ESXi 5

After upgrading my dev datacenter and rebooting the first ESXi 5 host, I realized that one of my fiber datastores was missing.  The path to the datastore was still visible to the host under the HBA, but it was not showing as an available datastore in the storage view.  Upon investigation, the datastore had been tagged as a snapshot datastore and was not mounting properly to the host.  This can be found by running the following:

esxcli storage vmfs snapshot list

You will see an output similar to:

<UDID>

   Volume Name: <VOLUME_NAME>

   VMFS UUID: <UDID>

   Can mount: true

   Reason for un-mountability:

   Can resignature: false

   Reason for non-resignaturability: the volume is being actively used

   Unresolved Extent Count: 2

Next, I had to force mount the datastore in CLI by first changing to “/var/log” and running:

esxcli storage vmfs snapshot mount -u <UUID> -l <VOLUME_NAME>

The command will be persistent across reboots.  If you would like to make it non-persistent then you will need to add “-n” to your command.  Once it is run, check your host and the datastore should be showing as an available datastore again.  No reboot needed and the change takes affect immediately.

You can also mount the datastore using the vSphere client as well by following the below steps:

  1. Go to your host in question
  2. On the storage tab, click add storage
  3. Choose disk/LUN
  4. Find the LUN that is missing. If it is not shown, you will need to use the above steps to mount using CLI
  5. Under mount options, choose “Keep Existing Signature” to mount persistent across reboots
  6. Click through to finish

There are a few caveats to force mounting a datastore though.  The datastore can only be mounted if it doesn’t already exist with a unique UDID.  If you choose to use the client to force mount the datastore, it cannot be mounted to other hosts in the same datacenter.  You will need to use the CLI steps posted above to mount to other hosts.

For more information about this issue and steps to fix in ESX/ESXi 4 and 3.5, you can find the VMware KB here.